
Introducing Convex for Swift

On the heels of last month’s release of Convex for Android, I’m excited to announce Convex Swift, which unlocks the ability to build iOS and MacOS clients for your Convex app.
Like with the Android library, my goal was to create an API that’s familiar to Swift devs and Convex devs alike.
For those familiar with developing for Apple platforms, the library makes use of the Combine framework which powers parts of SwiftUI and Swift’s async/await functionality. For those already familiar with Convex, you get all the goodness of queries, mutations and actions and the ability to use your backend data and logic to reach an even wider audience.
Getting started
Like our other client libraries, the Swift library is designed for you to build user interfaces that are a function of your Convex application state. The iOS Swift quickstart shows the basic steps requires to get a simple SwiftUI + Convex app off the ground.
What does it look like to build a more fully-functional application though? Read on to see how we might structure a SwiftUI version of the chat app from the official Convex tour.
Say hello to ConvexClient
At the heart of Convex Swift is the ConvexClient. It wraps the official convex-rs Rust client (which handles the connection and communication with the backend) in a developer friendly Swift API.
Your application should keep a single reference to a ConvexClient and use it whenever it needs to communicate with the backend. To create a client, simply pass it the Convex deployment URL to connect to.
1let convex = ConvexClient(deploymentUrl: "$YOUR_DEPLOYMENT_URL")
2
ConvexClient provides methods like mutation to trigger updates to your data based on passed in arguments and subscribe to reactively receive results from a Convex query.
Passing messages with Swift structs
It’s idiomatic to represent structured data as a struct in Swift. Not surprisingly they’re a great fit for the chat messages our app will send and receive and they work well with the ConvexClient too. Here’s a short struct for the chat messages:
1struct ChatMessage: Decodable {
2  let author: String
3  let body: String
4}
5
The struct conforms to the Decodable protocol so it can be marshaled across the FFI boundary between the Kotlin and Rust layers of the library. The author and body properties allow the ChatMessage to match the “shape” of the data stored in the backend messages table.
Querying Convex in a ViewModel
Now that we have our ConvexClient and a struct to represent the data, we need to make the chat data available to our future UI. To do that we’ll create a ViewModel class that conforms to SwiftUI’s ObservableObject protocol. It will house the business logic required to implement a simple chat client: sending and receiving messages.
💡Depending on your goals and/or app scale, you might consider pushing your use of
ConvexClientfurther down and abstracting it from your ViewModels. It seems fairly common to have fewer layers in SwiftUI applications though, which is what we’re presenting in this guide. If you want to see an example of more layering, check out this (third party) Github repo.
SwiftUI offers a couple of options for creating ViewModels: the newer @Observable macro and the ObservableObject protocol. We’re going to go with the tried and true ObservableObject due to some current quirks with @Observable.
First of all, let’s get data into our app by subscribing to a Convex query. We’ll use the @Published wrapper to present the subscription to the incoming chat data as a plain array that will get updated over time.
1class ChatViewModel: ObservableObject {
2  @Published var incoming: [ChatMessage] = []
3
4  init() {
5    convex.subscribe(to: "messages:list")
6      .replaceError(with: [])
7      .receive(on: DispatchQueue.main)
8      .assign(to: &$incoming)
9  }
10}
11
That sets up a query subscription that will assign the latest results to the incoming value whenever the backend data changes.
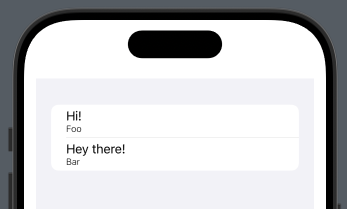
A reactive list of chat messages
With that bit of code in place we’re ready to surface ChatMessage data in a UI! We’ll provide our ChatViewModel and use a SwiftUI List to show the messages.
1struct ChatView: View {
2  @StateObject var viewModel: ChatViewModel
3
4  var body: some View {
5    return VStack {
6      List {
7        ForEach(viewModel.incoming) { message in
8          VStack(alignment: .leading) {
9            Text(message.body)
10            Text(message.author).font(.system(size: 12, weight: .light, design: .default))
11          }
12        }
13      }
14    }.padding()
15  }
16}
17
18
If you simply do something like that, attempting to iterate over ChatMessage values, the compiler is going to complain at you with a message like:
Referencing initializer 'init(_:content:)' on 'ForEach' requires that 'ChatMessage' conform to 'Identifiable’
That’s because SwiftUI needs to be able to identify each item in order to know if it was already present in the list that it has already rendered. We can easily conform Convex data to Identifiable by plumbing through the builtin _id field. We’ll need to tweak our ChatMessage to do that.
First we add Identifiable to the protocols that it conforms to, and then we’ll add the required id field and use a CodingKeys enum to map Convex’s document _id to it.
1struct ChatMessage: Identifiable, Decodable {
2  let id: String
3  let author: String
4  let body: String
5
6  enum CodingKeys: String, CodingKey {
7    case id = "_id"
8    case author
9    case body
10  }
11}
12
With that code in place, our app can now render chat messages received from Convex!
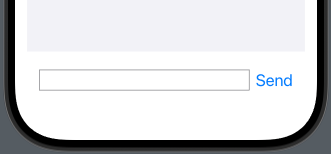
Composing and sending messages
A chat app isn’t a chat app without the ability to … chat! So let’s add the ability to send messages.
Back in our ChatViewModel, we’ll add a new @Published property to hold the outgoing message that a user can compose and send. We’ll also add a method that uses a Convex mutation to send the message and clear the outgoing value so another message can be composed
1class ChatViewModel: ObservableObject {
2  @Published var incoming: [ChatMessage] = []
3  @Published var outgoing: String = ""
4
5  // Skipping the existing init() method ...
6
7  func sendOutgoing() {
8    Task {
9      @MainActor in
10      try await client.mutation(
11        "messages:send", with: ["author": "iOS Demo User", "body": outgoing])
12      outgoing = ""
13    }
14  }
15}
16
In the UI, we’ll add a TextField to connect to the outgoing message property and a Button to connect to the sendOutgoing method.
1struct ChatView: View {
2  @StateObject var viewModel: ChatViewModel
3
4  var body: some View {
5    return VStack {
6	    // Skipping the existing incoming messages List ...
7
8      HStack {
9        TextField("", text: $viewModel.outgoing)
10          .border(.secondary).font(.title2)
11        Button(action: viewModel.sendOutgoing) {
12          Text("Send").font(.title2)
13        }
14      }.padding()
15    }.padding()
16  }
17}
18
The HStack places the TextField and Button side by side. That’s all we need to create a simple UI for composing and sending a new message.
Keeping up with the conversation
If you’ve following along this far, and have managed to send and receive enough messages, you might have noticed that there’s a problem with our UI. When enough messages are in the query results, they overflow the bottom of the list and new messages aren’t immediately visible. You have to manually scroll to see them!
We can solve that problem with a bit of SwiftUI.
We’ll wrap our List in a ScrollViewReader that will allow us to scroll the list when the data changes. ScrollViewReader lets us attach code to an onChange handler that we can supply with the incoming list of messages. The handler has access to the old and new state of the data and we simply scroll to the element tagged with the last id. To do that though, we need to tag the VStack that we create with the message author and body with the id.
1    ScrollViewReader { scrollView in
2      List {
3        ForEach(incoming) { message in
4          VStack(alignment: .leading) {
5            Text(message.body)
6            Text(message.author).font(.system(size: 12, weight: .light, design: .default))
7          }.id(message.id)
8        }
9      }.onChange(of: incoming, initial: true) { oldMessages, newMessages in
10        withAnimation {
11          scrollView.scrollTo(newMessages.last?.id)
12        }
13      }
14    }
15
Now as new messages are sent and received, the UI will scroll them into view.
When things go wrong
We’re almost at the end of this walkthrough, but I want to turn our attention back to something that we defined near the start. This is what our Convex query subscription code looks like:
1    convex.subscribe(to: "messages:list")
2      .replaceError(with: [])
3      .receive(on: DispatchQueue.main)
4      .assign(to: &$incoming)
5
Notice that we paper over errors received from the query by replacing them with an empty list. That doesn’t allow us to handle them properly (an empty list could mean there are no messages in the chat yet - that’s not an error).
To improve on that, we’ll turn to Swift’s Result enum. It lets us capture potential success and failure state in one type that we can inspect in the UI and use for proper error handling.
First we’ll change the ChatViewModel and subscription code to publish Result<[ChatMessage], ClientError> instead of a plain [ChatMessage].
1// Skipping the existing outgoing message code below ...
2class ChatViewModel: ObservableObject {
3  @Published var incoming: Result<[ChatMessage], ClientError> = Result.success([])
4
5  init() {
6    convex.subscribe(to: "messages:list")
7      .map(Result.success)
8      .catch {error in Just(Result.failure(error))}
9      .receive(on: DispatchQueue.main)
10      .assign(to: &$incoming)
11  }
12}
13
The ClientError type encapsulates the types of errors you can receive from Convex. Now data from the query gets mapped to Result.success and errors are caught and a Result.failure is published.
The last step is updating the UI to deal with the Result type and not a plain list.
First we’ll extract the list of ChatMessages into its own MessageList view. It will keep operating on a simple array of [ChatMessage].
1struct MessageList: View {
2  var incoming: [ChatMessage]
3
4  var body: some View {
5    ScrollViewReader { scrollView in
6      List {
7        ForEach(incoming) { message in
8          VStack(alignment: .leading) {
9            Text(message.body)
10            Text(message.author).font(.system(size: 12, weight: .light, design: .default))
11          }.id(message.id)
12        }
13      }
14      .onChange(of: incoming, initial: true) { oldMessages, newMessages in
15        withAnimation {
16          scrollView.scrollTo(newMessages.last?.id)
17        }
18      }
19    }
20  }
21}
22
Then we’ll update the ChatView to show either the MessageList or an error message depending on the Result.
1struct ChatView: View {
2 @StateObject var viewModel: ChatViewModel
3
4 var body: some View {
5 return VStack {
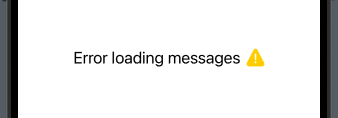
6 switch viewModel.incoming {
7 case .success(let messages):
8 MessageList(incoming: messages)
9 case .failure(_):
10 Spacer()
11 HStack {
12 Text("Error loading messages").font(.title2)
13 Image(systemName: "exclamationmark.triangle.fill").resizable().frame(
14 width: 24.0, height: 24.0
15 ).foregroundStyle(.yellow)
16 }
17 Spacer()
18 }
19
20 HStack {
21 TextField("", text: $viewModel.outgoing)
22 .border(.secondary).font(.title2)
23 Button(action: viewModel.sendOutgoing) {
24 Text("Send").font(.title2)
25 }
26 }.padding()
27 }.padding()
28 }
29}
30If you purposely trigger an error (like calling the wrong query name, messages:listfoo) you’ll now see an error display rendered instead of the message list.
Where to next?
The walkthrough above left out some details for the sake of brevity. It’s minimally styled, doesn’t support many features expected in chat applications and we didn’t even build in user authentication. But hopefully it gave you a taste for what it’s like to build a Swift application using Convex.
If you’re interested in building out a compelling UI using SwiftUI, take a look at Apple’s SwiftUI App Dev Tutorials.
If you want more details on how to use Convex with Swift, check out the official docs and the source code for a multi-screen example app with auth support called Workout Tracker.
We’re excited to see what you build with Convex Swift - let us know if you hit any bugs or have a feature request by filing an issue in the convex-swift Github repo.
Convex is the backend platform with everything you need to build your full-stack AI project. Cloud functions, a database, file storage, scheduling, workflow, vector search, and realtime updates fit together seamlessly.