

Setting Up Cloudflare Pages for Convex Preview Deployments: A Step-by-Step Guide
Setting up Cloudflare Pages for Convex deployments is a guest Stack Post from the community by Atul Raghuvanshi and Convex Champion, Matt Luo.
At ClarityText we’ve been leveraging Cloudflare Pages to streamline the development and testing process for our application, Language Hopper. Cloudflare Pages has become an indispensable tool for us, particularly for its ability to create preview deployments for every branch pushed to our repository. This feature allows us to test changes in isolation before merging them into the main branch, ensuring a smooth and error-free deployment process. In this article, we’ll walk you through how we set up Language Hopper on Cloudflare Pages, using npm as the package manager and enabling Node.js compatibility for our Next.js application. We’ll also dive deeper into the benefits of preview deployments, how to configure your project for optimal performance, and tips for troubleshooting common issues.
Why We Chose Cloudflare Pages for test deployments
Before adopting Cloudflare Pages, we faced challenges in managing multiple environments for testing and production. Cloudflare Pages solved this problem by providing:
Preview Deployments: Every branch pushed to our repository automatically generates a unique preview URL, allowing us to test changes in a live environment without affecting the main site.
-
Seamless Git Integration: Cloudflare Pages integrates effortlessly with GitHub, GitLab, and other Git providers, making it easy to automate builds and deployments.
-
Edge Network Performance: By deploying on Cloudflare’s global edge network, Language Hopper benefits from faster load times and improved reliability.
-
Node.js Compatibility: With built-in support for Node.js, we can run server-side logic and APIs directly on the edge, reducing latency and improving user experience.
-
Convenient collaboration with people external to our company: Send a preview URL to anyone/everyone without Vercel's manual authorizations.
These features have made Cloudflare Pages an essential part of our development workflow.
Now, let’s dive into how you can set up your own project on Cloudflare Pages.
Prerequisites
Before we begin, ensure you have the following:
- A Cloudflare account.
- A Git repository (e.g., GitHub, GitLab) with your project.
- Node.js and npm installed locally.
- A basic understanding of Git and command-line tools.
Step 1: Onboarding Process
One of the key aspects of using Cloudflare Pages effectively is ensuring that your team members have the right access and permissions to manage deployments. In this section, we’ll walk you through the onboarding process, including how to create a Cloudflare account, invite team members, and assign admin roles so they can proceed with deployments.
Step 1: Create a Cloudflare Account
If you or your team members don’t already have a Cloudflare account, follow these steps to create one:
- Go to the Cloudflare website.
- Click on the Sign Up button in the top-right corner.
- Enter your email address and create a password.
- Verify your email address by clicking the link sent to your inbox.
- Once verified, log in to your Cloudflare account.
Step 2: Invite Team Members
After setting up your account, you’ll need to invite your team members to collaborate on the project. Here’s how:
- Log in to your Cloudflare account and navigate to the Members section under your account settings.
- Click on Invite Members.
- Enter the email addresses of the team members you want to invite.
- Assign the appropriate role. For team members who will be managing deployments, select the Admin role. This will give them full access to create, configure, and deploy projects on Cloudflare Pages.
- Click Send Invite.
Your team members will receive an email invitation to join your Cloudflare account. Once they accept the invitation, they’ll have the necessary permissions to proceed with the deployment process.
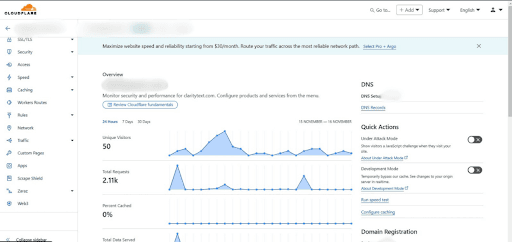
After joining the team member should see a similar dashboard like the one in the image below.
Step 3: Assigning Roles and Permissions
Cloudflare offers several roles with varying levels of access:
- Admin: Full access to all features, including billing, account settings, and deployments.
- Super Admin: Similar to Admin but with additional permissions for managing other members.
- Billing: Access to billing information only.
- Read-Only: View-only access to account settings and deployments.
For most team members involved in the deployment process, the Admin role is sufficient. However, if you have team members who only need to monitor deployments or handle billing, you can assign them more restricted roles.
Step 4: Proceeding with Deployment
Once your team members have been onboarded and assigned the appropriate roles, they can proceed with the deployment process as outlined in the previous sections. Here’s a quick recap of what they’ll need to do:
- Connect the Git repository to Cloudflare Pages.
- Configure the build settings, including the build command and output directory.
- Enable Node.js compatibility by adding the necessary environment variables and build flags.
- Test the deployment by pushing a new branch and verifying the preview URL.
By following this onboarding process, you’ll ensure that your team is well-equipped to manage deployments efficiently and collaborate effectively on your Cloudflare Pages projects.
Step 2: Add the Build Script
Cloudflare Pages requires a build script to generate the static files for your site. For Next.js applications, we use the @cloudflare/next-on-pages package to ensure compatibility with Cloudflare’s edge runtime. Add the following line under the "scripts" section of your package.json file:
1pages:build": "npx @cloudflare/next\-on\-pages"
2
This script will build your Next.js application in a format that’s optimized for Cloudflare Pages.
You can try to run the build locally by running the command
1npm run pages:build
2
Step 3 : Create the _worker.js Configuration File
Cloudflare Pages uses a _worker.js file or a wrangler.toml configuration file to define how your application should be deployed. Create a wrangler.toml file in the root of your project and add the following configuration:
1npm i wrangler name \= "name-of-the-project"
compatibility\_flags \= \["nodejs\_compat\_v2"\]
main \= ".worker-next/index.mjs"
assets \= { directory \= ".worker-next/assets", binding \= "ASSETS" }
2Here’s what each line does:
name: replace"name-of-the-project"with the name of your project.compatibility_flags: This enables Node.js compatibility. Use"nodejs_compat_v2"for the latest Node.js compatibility features.main: specifies the entry point for your worker.assets: defines the directory for static assets and binds them to theASSETSvariable.
Step 4: Connect Your Git Repository to Cloudflare Pages
-
Log in to your Cloudflare account and navigate to Pages.

-
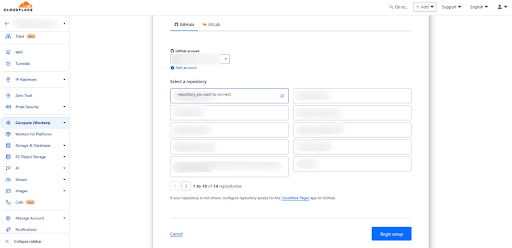
Click Create a Project and select your Git provider (e.g., GitHub, GitLab) and Choose the repository you want to deploy.
-
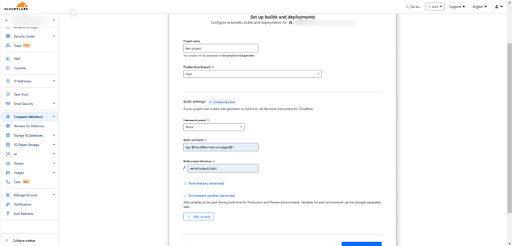
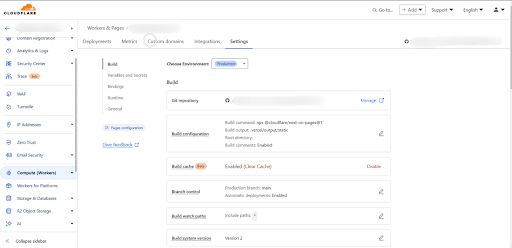
In the set up and builds and deployments you should see a page something like the image below
Add
npx @cloudflare/next-on-pages@1as the build command and .vercel/output/static in the build output directoryThis is an important detail. For those who are familiar with deploying a Convex deployment on Vercel, you may be aware about overriding the build command in the Vercel configuration to something like:
npx convex deploy \--cmd 'npm run buildFor our Language Hopper testing, we don’t override the build command with this
npx convex deploycommand. -
Add environment variables to be used during build time for Production and Preview environments. Variables for each environment can be changed separately later.
-
Click Save and Deploy.
Step 5: Enable Node.js Compatibility for Production and Preview Deployments
After connecting your repository, you’ll need to enable Node.js compatibility for both production and preview deployments. Here’s how:
-
Go to your project’s settings in Cloudflare Pages, the settings page looks like the image below
-
Under Bindings, locate the Compatibility flags section and add nodejs_compat_v2 or nodejs_compat flag.
For more details on Node.js compatibility flags because as of September 23rd 2024, the nodejs_compat compatibility flag enables the exact same behaviour as the nodejs_compat_v2 compatibility flag, as long as your compatibility date is set to September 23rd 2024 or later.
Source: Cloudflare Workers Node.js Documentation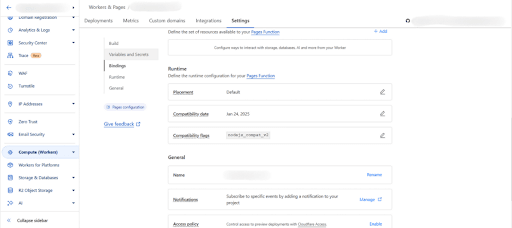
Step 6: Test Your Deployment
Once your main branch is deployed, Cloudflare Pages will automatically create a production deployment. Any new branches you push will generate preview deployments, allowing you to test changes before merging them into the main branch.
To test your deployment:
- Push a new branch to your repository.
- Cloudflare Pages will automatically build and deploy the branch.
- Visit the preview URL provided in the Cloudflare Pages dashboard to verify your changes.
Troubleshooting Common Issues
While Cloudflare Pages is relatively easy to use, you may encounter some challenges during setup. Here are a few common issues and how to resolve them:
- Build Failures: Check the build logs in the Cloudflare Pages dashboard if your build fails. Common causes include missing dependencies or incorrect build commands.
- Node.js Compatibility Errors: If your application relies on Node.js APIs that aren’t supported, you may need to adjust your code or use polyfills. Refer to the Cloudflare Workers Node.js Compatibility Documentation for guidance.
- Asset Loading Issues: Ensure your static assets are correctly configured in the
wrangler.tomlfile. Double-check theassetsdirectory and binding settings.
Conclusion
Setting up a website on Cloudflare Pages is straightforward, especially when using npm as your package manager. By following the steps outlined in this article, you can configure Node.js compatibility, automate builds, and leverage preview deployments to streamline your development workflow. Don’t forget to refer to the Cloudflare Workers Node.js Compatibility Documentation for advanced configuration options.
For us at Clarity, Cloudflare Pages has been a game-changer, enabling us to test and deploy updates with confidence. We hope this guide helps you achieve the same level of efficiency and reliability in your projects.
Happy deploying! 🚀
Convex is the backend platform with everything you need to build your full-stack AI project. Cloud functions, a database, file storage, scheduling, workflow, vector search, and realtime updates fit together seamlessly.