
Lucia Auth: Implement Custom Authentication
Note: This approach is old and has its limitations. Consider using Convex Auth instead.
Implementing user authentication (sign up, log in, log out) is hard! Authentication is an end-to-end feature involving secrets and credentials - the most sensitive kind of app development. For this reason it’s a good idea to outsource this problem to auth solution providers like Clerk or Auth0, or OAuth providers like Google or Github.
Unfortunately using a third-party comes with its own challenges: User data needs to be synced between the external service and your database. Auth solution providers need to be configured, can come with technical limitations and might charge a hefty sum once your app surpasses their free tiers.
Similarly, OAuth providers can be difficult to set up initially, and they can limit audience if your users do not have an account with a given provider.
For all these reasons you might want to implement authentication yourself. To simplify this, it’s a good idea to use an authentication library such as Lucia, which will manage the logic around users, sessions and credentials for you.
With Lucia and Convex, we can build APIs reading current user information simply like this:
1import { queryWithAuth } from "./withAuth";
2
3export const getLoggedInUserEmail = queryWithAuth({
4  args: {},
5  handler: async (ctx) => {
6	  return ctx.session?.user.email;
7  }
8});
9
No external database or provider required!
We put together a template which includes sign up, log in and log out flows. Check out the GitHub repo or follow along with this article for the details.
Update: Even easier integration
Run npm create convex@latest -- -t nextjs-lucia-shadcn to start a new project with a template that includes authentication based on Lucia, using the convex-lucia-auth NPM library.
The rest of this article goes over the manual integration of Lucia with Convex, which is still helpful for understanding and in case you want total control over configuring Lucia.
Overview of the user experience
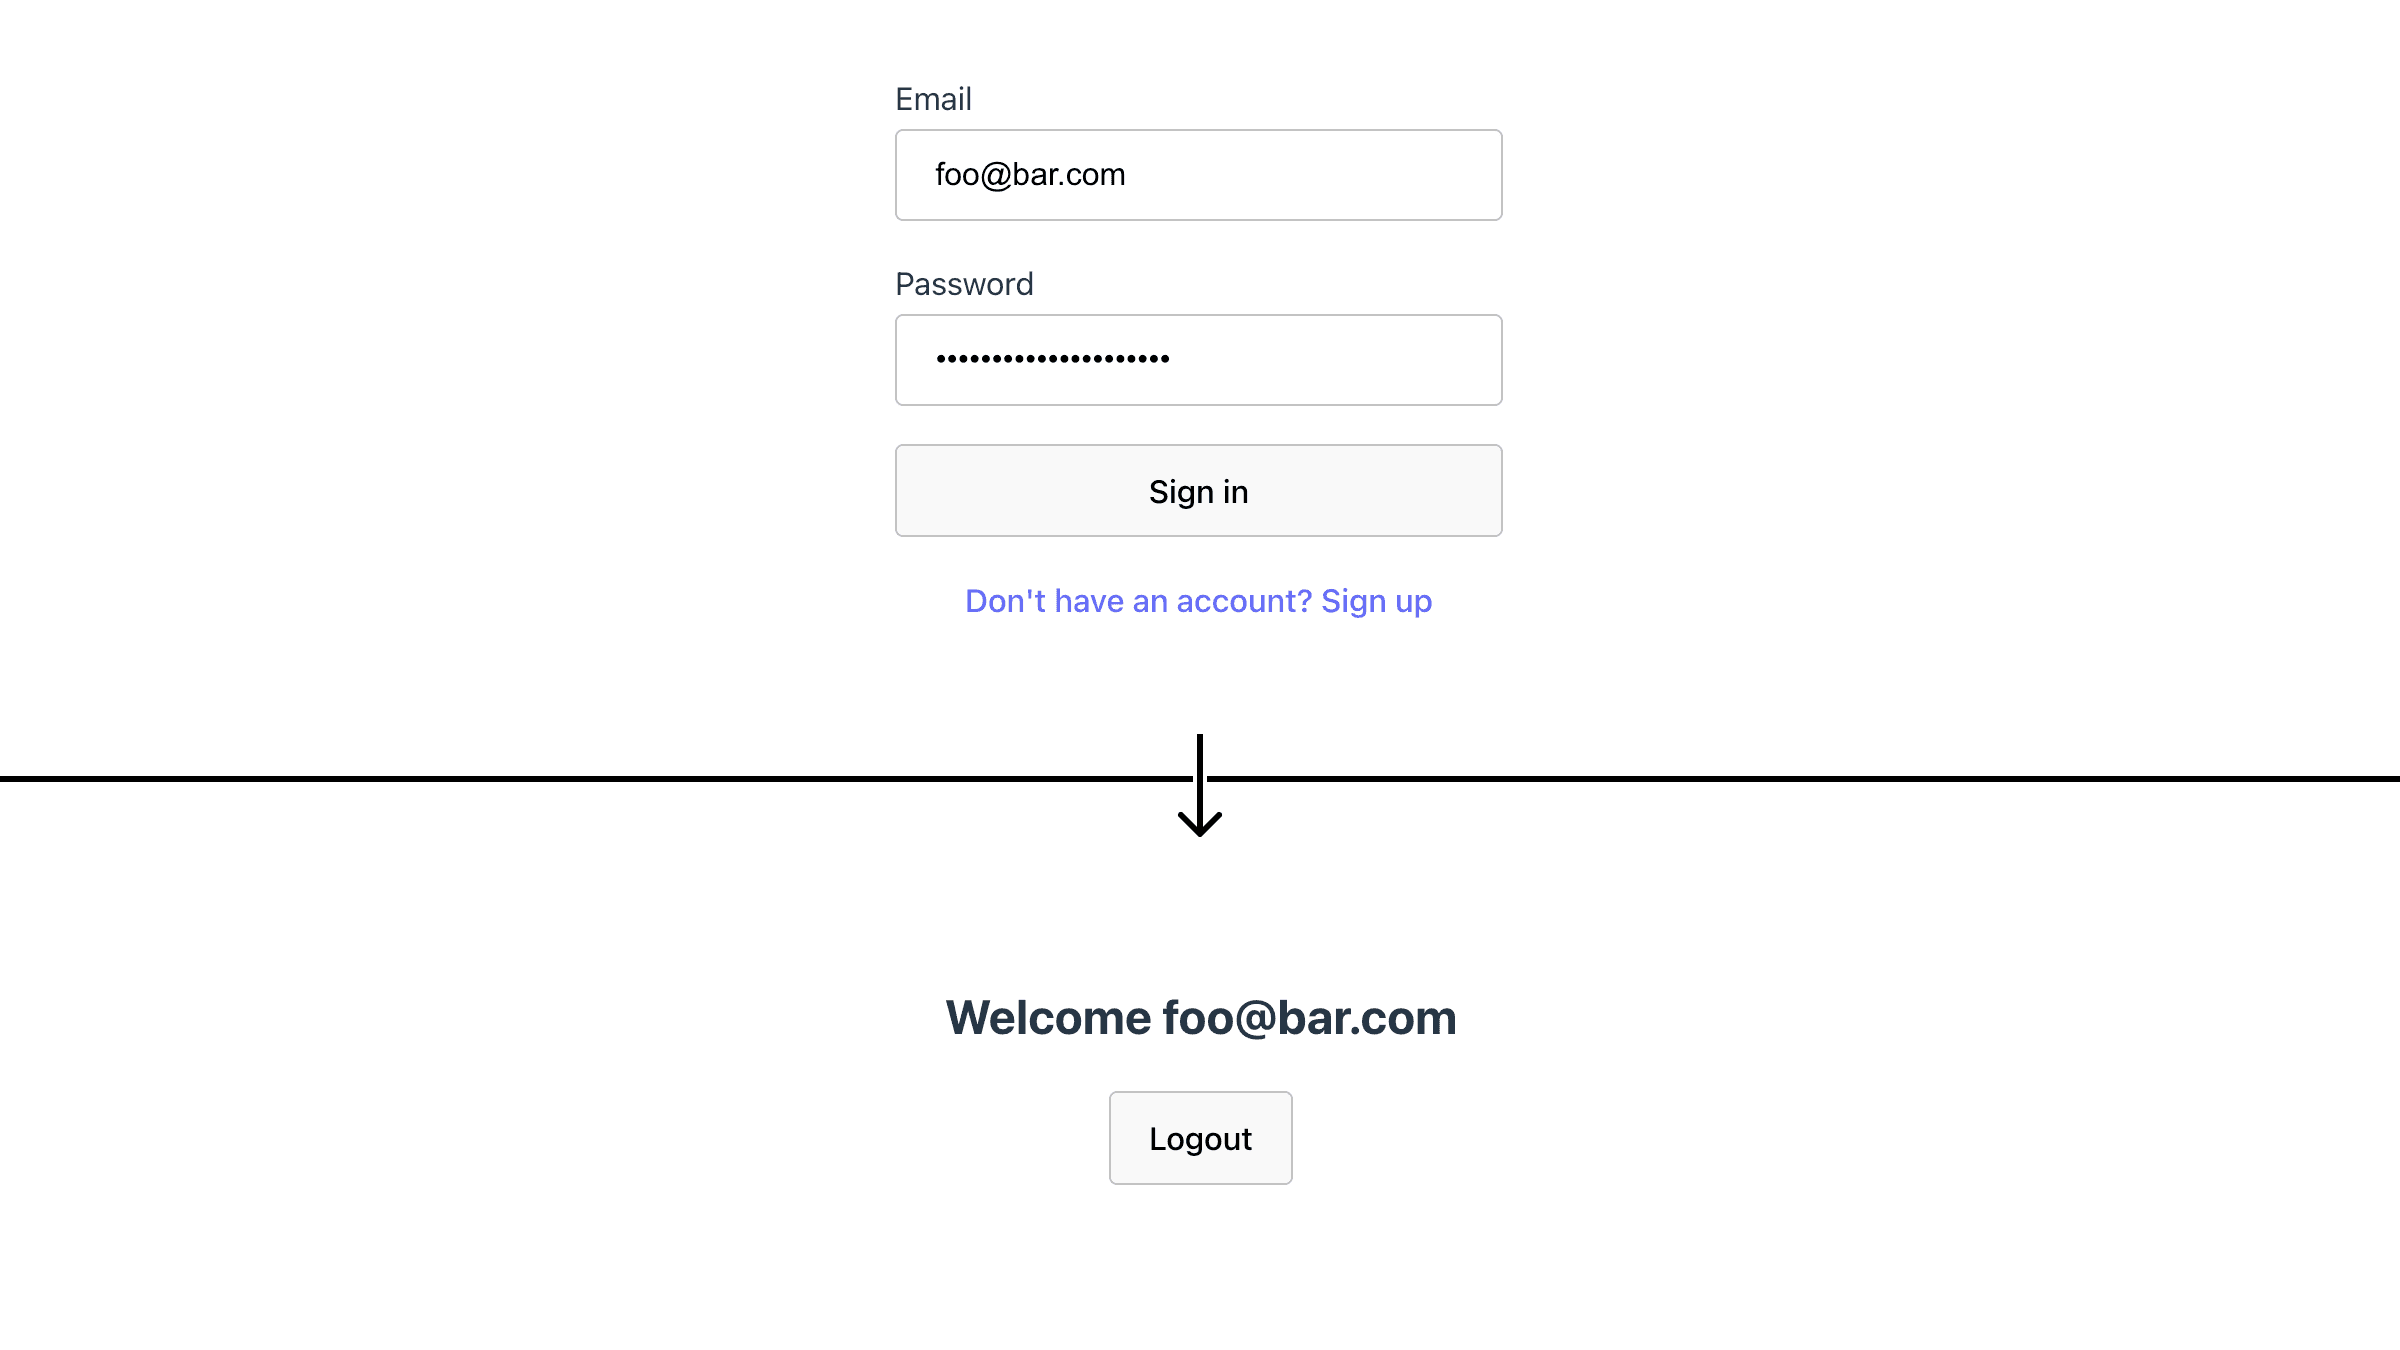
For this template we implemented a sign up / sign in flow which asks the user for their email and password. Once the user clicks Sign Up or Sign In their credentials are checked and they are either logged in or an error message is shown.
Once the user is logged-in we show them data associated with their account, in our case that’s their email, and a button that enables them to log out.
Let’s look at how this experience is implemented.
Step 1: Specify our database schema
Although Convex doesn’t strictly require you to declare your database schema up front, in this case it will be helpful for us to look at what data we’ll be storing, and to get types since we’ll be using TypeScript for end-to-end type safety throughout our auth implementation.
1// convex/schema.ts
2
3import { defineSchema, defineTable } from "convex/server";
4import { Validator, v } from "convex/values";
5
6export default defineSchema({
7  users: defineTable({
8    id: v.string(),
9    email: v.string(),
10  }).index("byId", ["id"]),
11  sessions: defineTable({
12    id: v.string(),
13    user_id: v.string(),
14    active_expires: v.float64(),
15    idle_expires: v.float64(),
16  })
17    .index("byId", ["id"])
18    .index("byUserId", ["user_id"]),
19  auth_keys: defineTable({
20    id: v.string(),
21    hashed_password: v.union(v.string(), v.null()),
22    user_id: v.string(),
23  })
24    .index("byId", ["id"])
25    .index("byUserId", ["user_id"]),
26});
27
We declare three tables:
userswhich stores data for each usersessionswhich stores data for each session, mainly to do with its expiration- and
auth_keys, which represent different user credentials using any sign-in method
This schema will be used by our database adapter. It satisfies Lucia’s requirements. The only caveat to mention is that Lucia is currently architected to allocate IDs itself, while Convex allocates IDs automatically when documents are created. For this reason our users, sessions and auth_keys will have two ID fields: Convex allocated, built-in _id and Lucia allocated id.
For this demo we added an email field for storing the user’s email.
In our template repo we split the schema between the fields required by Lucia and custom fields, so our schema looks much simpler:
1export default defineSchema({
2  ...authTables({
3    user: { email: v.string() },
4    session: {},
5  }),
6});
7
Let’s get on with implementing the database adapter that will enable us to take advantage of Lucia’s features.
Step 2: Configure Lucia
We’ll want to interact with Lucia from our server queries and mutations. For this we’ll define a function which will instantiate Lucia, with our Convex adapter. This is the getAuth function:
1// lucia.ts
2import { lucia } from "lucia";
3import { DatabaseWriter } from "./_generated/server";
4
5export function getAuth(db: DatabaseWriter) {
6  return lucia({
7    adapter: convexAdapter(db),
8    // TODO: Set the LUCIA_ENVIRONMENT variable to "PROD"
9    // on your prod deployment's dashboard
10    env: (process.env.LUCIA_ENVIRONMENT as "PROD" | undefined) ?? "DEV",
11    getUserAttributes(user: UserSchema) {
12      return {
13        _id: user._id,
14        _creationTime: user._creationTime,
15        email: user.email,
16      };
17    },
18  });
19}
20
We can call this function from any query* or mutation, passing in ctx.db. convexAdapter is the actual database adapter implementation. Check out its source on Github.
With Convex, implementing the database was straightforward. You can check Lucia’s adapter API docs here.
In the getUserAttributes configuration we expose the _id, _creationTime and email documents fields to code loading users via getAuth.
*As you can see in the code, getAuth accepts DatabaseWriter. This is the database interface exposed to Convex mutations. Convex queries can only read from the database, not write to it, and so they have access to DatabaseReader instead. When we call getAuth from a query helper in Step 3, our types won’t perfectly match runtime execution. Lucia’s API is not split between read and write operations, type-wise. We could declare a read-only subset of Lucia’s Auth API and return it from an additional getReadOnlyAuth function, but this won’t be necessary as we’ll only use a single, read-only, method in queries: getSession.
Configuring types
Lucia has a cool way of injecting custom database types into its APIs. These are our definitions:
1// convex/env.d.ts
2
3declare namespace Lucia {
4  type Auth = import("./lucia").Auth;
5  type DatabaseUserAttributes = {
6    _id: import("./_generated/dataModel").Id<"users">;
7    _creationTime: number;
8    email: string;
9  };
10  type DatabaseSessionAttributes = {
11    _id: import("./_generated/dataModel").Id<"sessions">;
12    _creationTime: number;
13  };
14}
15
If we add more fields to our "users" table that we want to access through getAuth, we can add them here.
Step 3: Leverage Lucia in our functions - queries
With the adapter and schema in place, it’s time to use them to implement our authentication logic.
Lucia includes middleware for storing and accessing session IDs on Requests and Responses. Since we want to use Convex’s reactive client which uses a WebSocket, we’ll instead pass the session ID through function arguments and return values.
Our simple “read” “middleware” will use the following function that returns a session if the given session ID is valid:
1import { getAuth } from "./lucia";
2import { QueryCtx } from "./_generated/server";
3
4async function getValidExistingSession(
5  ctx: QueryCtx,
6  sessionId: string | null
7) {
8  if (sessionId === null) {
9    return null;
10  }
11  // The cast is OK because we will only expose the existing session
12  const auth = getAuth(ctx.db as DatabaseWriter);
13  try {
14    const session = (await auth.getSession(sessionId)) as Session | null;
15    if (session === null || session.state === "idle") {
16      return null;
17    }
18    return session;
19  } catch (error) {
20    // Invalid session ID
21    return null;
22  }
23}
24
With this helper we can implement a query that relies on the user information attached to a session:
1import { query } from "./_generated/server";
2
3export const getLoggedInUserEmail = query({
4  args: {
5    sessionId: v.union(v.null(), v.string()),
6    // other argument validators
7  },
8  handler: async (ctx, args) => {
9    const session = await getValidExistingSession(ctx, args.sessionId);
10    return session.user.email;
11  },
12});
13
Having to declare that we take a sessionId for every query that needs to use the session information would get old quite quickly. For this reason we implemented a queryWithAuth wrapper that does this for us. Check it out in the repo. With it, accessing session is as simple as with Convex’s built-in auth. Our query ctx gets new session field:
1import { queryWithAuth } from "./withAuth";
2
3export const getLoggedInUserEmail = queryWithAuth({
4  args: {},
5  handler: async (ctx) => {
6	  return ctx.session?.user.email;
7  }
8});
9
We can access user information, but how does the information get into our DB in the first place?
Step 4: Leverage Lucia in our functions - mutations
Armed with getAuth we can now implement our sign up and sign in mutations:
Sign up
1import { v } from "convex/values";
2import { getAuth } from "./lucia";
3
4export const signUp = mutation({
5  args: {
6    email: v.string(),
7    password: v.string(),
8  },
9  handler: async (ctx, { email, password }) => {
10    const auth = getAuth(ctx.db);
11    const user = await auth.createUser({
12      key: {
13        password: password,
14        providerId: "password",
15        providerUserId: email,
16      },
17      attributes: { email },
18    });
19    const session = await auth.createSession({
20      userId: user.userId,
21      attributes: {},
22    });
23    return session.sessionId;
24  }
25});
26
Check out the Auth API reference. Here we use the createUser and createSession methods to sign the user up and log them in. The password field holds the secret provided by the user (in our case, a password), "password" is our sign up method (we might add OAuth provider as a different method later), and providerUserId in our case is the user-filled out email.
Under the hood this method creates both a document in our "users" table and also a key in our "auth_keys" table.
We then create a session for the user and return its ID to the client. If an error occurs, such someone trying to sign up with an email that’s already taken, Lucia will throw and the error will propagate to the client.
Sign in
1import { v } from "convex/values";
2import { getAuth } from "./lucia";
3
4export const signIn = mutation({
5  args: {
6    email: v.string(),
7    password: v.string(),
8  },
9  handler: async (ctx, { email, password }) => {
10    const auth = getAuth(ctx.db);
11    const key = await auth.useKey("password", email, password);
12    const session = await auth.createSession({
13      userId: key.userId,
14      attributes: {},
15    });
16    return session.sessionId;
17  }
18});
19
Check out the Auth API reference. Here we use useKey and createSesson to sign the user in.
useKey takes the sign up method ("password" in our case) and the unique providerUserId and secret (in our case, the user provided password).
The cool thing is, you are in control of how the sign up / sign in works. The two mutations presented here are the standard approach, but you could for example combine sign up and sign in into a single form with a single mutation, or sign existing users in if they accidentally go through the sign up flow. It’s up to you!
Other mutations
Just like with queries, we made a wrapper for mutations that makes it easy to check that a user is currently signed in. Since mutations can update the database, we will not only validate the session, but also renew it:
1import { Auth } from "./lucia";
2
3async function getValidSessionAndRenew(auth: Auth, sessionId: string | null) {
4  if (sessionId === null) {
5    return null;
6  }
7  try {
8    // Lucia's `validateSession` auto-renews the session
9    return await auth.validateSession(sessionId);
10  } catch (error) {
11    // Invalid session ID
12    return null;
13  }
14}
15
16
Our wrapper uses this helper under the hood to expose both auth and session on ctx:
1
2import { mutationWithAuth } from "./withAuth";
3
4export const doSomethingAsTheUser = mutationWithAuth(
5  args: {},
6  handler: async (ctx) => {
7	  if (ctx.session === null) {
8	    throw new Error("Expected a logged-in user");
9	  }
10	  // do something...
11		// ctx.auth is `LuciaAuth` instead of Convex's `Auth`
12  },
13});
14
You can see in the repo that we used this wrapper to simplify signIn and signUp mutations as well.
Step 5: Frontend
Keeping track of a session
We’ll be storing the secret sessionId in localStorage, so we create a simple React Context provider for updating and accessing it:
1import { createContext, useCallback, useContext, useState } from "react";
2
3const SessionContext = createContext(undefined as any);
4
5export function useSessionId(): string | null {
6  return useContext(SessionContext).sessionId;
7}
8
9export function useSetSessionId(): (sessionId: string | null) => void {
10  return useContext(SessionContext).setSessionId;
11}
12
13export function SessionProvider({ children }: { children: React.ReactNode }) {
14  const [sessionId, setSessionIdState] = useState(getSavedSessionId());
15  const setSessionId = useCallback(
16    (value: string | null) => {
17      setSavedSessionId(value);
18      setSessionIdState(value);
19    },
20    [setSessionIdState]
21  );
22  return (
23    <SessionContext.Provider value={{ sessionId, setSessionId }}>
24      {children}
25    </SessionContext.Provider>
26  );
27}
28
29function getSavedSessionId() {
30  return localStorage.getItem("sessionId");
31}
32
33export function setSavedSessionId(sessionId: string | null) {
34  if (sessionId == null) {
35    localStorage.removeItem("sessionId");
36  } else {
37    localStorage.setItem("sessionId", sessionId);
38  }
39}
40
And wrap our app in it:
1// src/main.tsx
2
3ReactDOM.createRoot(document.getElementById("root")!).render(
4  <React.StrictMode>
5    <SessionProvider>
6      <ConvexProvider client={convex}>
7        <App />
8      </ConvexProvider>
9    </SessionProvider>
10  </React.StrictMode>
11);
12
Now we can use and set session ID from anywhere in our app:
1// src/App.tsx
2import { useSessionId } from "./SessionProvider.tsx";
3import { useQuery } from "convex/react";
4import { LoginForm } from "./LoginForm";
5
6function App() {
7  const sessionId = useSessionId();
8  const user = useQuery(api.users.get, {sessionId});
9
10  return (
11    <main>
12      {user === undefined ? (
13        <div>Loading...</div>
14      ) : user == null ? (
15        <LoginForm />
16      ) : (
17        <h2>Welcome {user.email}</h2>
18      )}
19    </main>
20  );
21}
22
Just like on the backend, we created a wrapper for useQuery that passes in the session ID automatically, so that we can we can simplify our code:
1// src/App.tsx
2
3// Our custom `useQuery` is imported here
4import { useQuery } from "./usingSession";
5
6function App() {
7  // sessionId is passed in automatically
8  const user = useQuery(api.users.get);
9  // ...
10}
11
Sign up / sign in form
Let’s see how we can implement the LoginForm component for sign up and sign in. This will be calling our signUp and signIn mutations.
1import { useState } from "react";
2import { useSetSessionId } from "./SessionProvider";
3import { useMutation } from "./usingSession";
4import { api } from "../convex/_generated/api";
5
6export function LoginForm() {
7  const setSessionId = useSetSessionId();
8  const [flow, setFlow] = useState<"signIn" | "signUp">("signIn");
9  const signIn = useMutation(api.users.signIn);
10  const signUp = useMutation(api.users.signUp);
11
12  const handleSubmit = async (event: React.FormEvent<HTMLFormElement>) => {
13    event.preventDefault();
14    const data = new FormData(event.currentTarget);
15    try {
16      // Call the corresponding mutation
17      const sessionId = await (flow === "signIn" ? signIn : signUp)({
18        email: (data.get("email") as string | null) ?? "",
19        password: (data.get("password") as string | null) ?? "",
20      });
21      // Set session ID in the Session React Context and localStorage
22      setSessionId(sessionId);
23    } catch {
24      alert(
25        flow === "signIn" ? "Invalid email or password" : "Email already in use"
26      );
27    }
28  };
29  return (
30    <form onSubmit={handleSubmit}>
31      <label htmlFor="username">Email</label>
32      <input name="email" id="email" />
33      <label htmlFor="password">Password</label>
34      <input type="password" name="password" id="password" />
35      {flow === "signIn" ? (
36        <input type="submit" value="Sign in" />
37      ) : (
38        <input type="submit" value="Sign up" />
39      )}
40      <a
41        style={{ cursor: "pointer" }}
42        onClick={() => {
43          setFlow(flow === "signIn" ? "signUp" : "signIn");
44        }}
45      >
46        {flow === "signIn" ? (
47          <>Don't have an account? Sign up</>
48        ) : (
49          <>Already have an account? Sign in</>
50        )}
51      </a>
52    </form>
53  );
54}
55
Since they are so similar this single form implements both sign in and sign up. You could extend it in any way you like, for example by adding an OAuth sign up method (Google, Github). Lucia can help with this as well, check out Lucia OAuth docs.
Conclusion and next steps
Well, that was a wild ride. As you can see even the simplest authentication implementation has a quite a few moving pieces. Good news is that you can start off by cloning our example repo with all of these pieces already hooked up.
You now have authentication that talks directly with the Convex database, and without any redirects or need for configuring third party services.
To take your app to production you have several options:
- Implement optional email verification and password recovery flow. See Lucia’s guide on email verification. You’ll need a third-party (or your own) SMTP server for sending emails (check out Resend).
- Switch to Clerk or Auth0 before you let external users interact with your app, throwing away your existing test signups.
- Switch to Clerk or Auth0 later, importing existing signups into their database. See Clerk import users doc or Auth0 bulk user import doc.
If you’re using SSR with Next.js, Remix, or similar, you can use Lucia’s built-in middleware to use cookies instead of localStorage for storing sessions. Remember to protect your app against CSRF attacks.
Convex is the backend platform with everything you need to build your full-stack AI project. Cloud functions, a database, file storage, scheduling, workflow, vector search, and realtime updates fit together seamlessly.